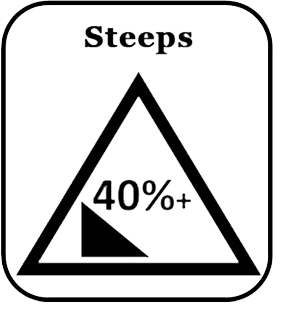
Skiing The Steeps
 Every skier has gazed above them at some wonderous zig-zagging line between rocks or ending at a cliff. These are the lines that fill Warren Miller movies and young skier’s imaginations. Few will ever ski these lines. To fully embrace a Great North American Ski Adventure, you should know how to ski these lines.
Major resorts offer classes and clinics that target specific types of terrain like the steeps. If these aren’t available, instructors of advanced and expert classes will usually let you request terrain that you want to learn to ski. One o the best ways to learn to ski the steeps is taking a private lesson.
As we’ve said often, the best advice Michael and I can offer you is to spend a couple seasons before your GNASA taking classes and clinics designed to hone your skills. Skiing within your abilities is your responsibility. NEVER SKI TERRAIN BEYOND YOUR ABILITIES.
On my GANSA I targeted marquis runs at the resorts I visited. These runs are often the steep and dangerous. The perfect adrenalin producing runs made for a GANSA. I did have a few rules.
- Live to ski another day
- Ski the most difficult runs only when snow conditions are pretty good
- Never ski in flat light (see 1 above)
- Check with ski patrol if the pitch is greater than 50 degrees
- Ski with locals if possible
Living to ski another day implies that I wasn’t going to take unnecessary risks on my GNASA. It was too important to make the next resort. This was the adventure of a lifetime. I didn’t want to cut it short because of an unnecessary injury. This rule didn’t eliminate runs. But I would take an easier line or side step to a safer place rather than risk an injury. If I wasn’t on my GNASA, I would probably probably have skied the more difficult line.
Ski the most difficult runs only when snow conditions are good. Good, is not great. Good means skiable. For me that simply meant, no ice, zastrugi, slabs, penitents or heavy crud.
Flat light is my kryptonite. Flat light minimizes the ability to see contrasts. The height of moguls can become confusing. A rise in the snow can be confused with a covered rock or stump. I’ve had my scariest falls in flat light.
Checking with ski patrol is always worth the effort. Noone knows the slopes better than experiences patrol. Use their knowledge to your advantage. I’ve often asked patrol about certain runs and they told me the best time of day to ski that run, and the best line on that run.
Ski with locals if possible. Locals that know the mountain and are interested inshowing you the mountain are often a VIP ticket. The right local can show a mountain in a way you would never see without one. They can also tell you the easier ways down a run. They’ve been there.
North American Resorts Known For Their Steeps & Quality Clinics or Classes To Teach The Steeps
- Taos
- Alta
- Squaw
- Snowbird
- Crested Butte
- Telluride
- Jackson Hole
- Revelstoke
- Big Sky
- Kicking Horse
Steep Terrain
There is no North American regulatory body that specifies what constitutes steep terrain. Resorts classify the difficulty of their own runs. But they do use the international conventions of color and shape. The color green, for beginner, blue for intermediate, and black for expert is universal. A circle for easiest, square for intermediate, diamond for advanced, and double diamond for expert only.
What these symbols actually represent in terms of pitch or gradient can vary a lot. Generally, a resort rates its run based on that run’s most difficult area. The universal colors and symbols designating levels of terrain difficulty are below.
| Ability | Shape & Color | Pitch – Gradient |
|---|---|---|
| Expert |  | 40% + Other Hazards |
| Advanced |  | 40%+ |
| Intermediate |  | 25 – 40% |
| Beginner |  | 6 – 25% |
For our purposes steep terrain start at pitches over 40 degrees combined with a healthy dose of fear.
Fear of the Steeps
Most of us ski for the adrenalin rush. That fear of flight condition that triggers your amygdala and hypothalamus resulting in a release of adrenalin throughout your body providing you with energy, and for many excitement. The rush is created from the danger associated with skiing. Nowhere is that danger more pronounced than in the steeps. For adrenalin junkies, the skier’s drug of choice is the steeps.
Talk or listen long enough with skiers that spend time on the steeps and you’ll hear a version of the following: If you fall, you can die.
The biggest challenge for skier’s learning to ski the steeps, according to instructors, is fear. Until fear is mastered, it easily paralyzes.
Harold Harb says that “It takes confidence in your abilities” to ski the steeps well. Ron LeMaster says, “[T]he first order of business is stability.” The implication is the same. Skiing steeps requires your ability to remove, or manage, fear. Confidence or stability on the steeps is the same way of saying your managing the underlying fear of falling.
Skiing The Steeps – Technique
It takes years to develop technique and the confidence to ski the steeps. Michael and I encourage you to take lessons focused on the steeps. We list some of the better-known programs below.
We will however, share some tips that when mastered, will give you confidence in the steeps. These quick tip techniques are all focused on defensive techniques that can be used in the steeps to get you down the slope.
Quick Tips – Skiing the Steeps
Skiing the Steeps Tip 1 – Become an Expert Side-Slipper
Develop confidence in side-slipping. Every expert skier is an expert in side slipping. Stopping involves side slipping technique. Turning, especially in the steeps and moguls often involves a variation of side-slipping.
The most important reason to become an expert in side-slipping is tha it will give you confidence in the steeps. Knowing you can side-slip in all conditions give you confidence that oif you get into a situation you cannot ski, you can side-slip to aplace where you can.
Skiing the Steeps Tip 2 – Learn To Kick Turn
A kick-turn is a way to change direction on a very small base (flat snow surface). To make a kick turn, you do the following, or something similar:
- Place your downhill pole uphill and behind you
- Create a balance point using your uphill ski and poles (try them both behind you) – your creating a kind of three-point stool for stability
- Kick or sweep your downhill leg forward and upward until your foot faces the opposite direction
- Find your new balance pint on this new downhill ski
- Pick up your uphill hand and ski and bring them around
Skiing the Steeps Tip 3 – Learn To Jump Turn
A jump turn is kind of what it implies. You jump and change the direction of your skis so that your able to change direction in the air rather than on the snow.
This type oif turn is oiften a “confidence booster” for tiugh gulleys where a monor miss in a carved turn can have you on rocks.
Skiing the Steeps Tip 4 – Learn To Zero Speed or Braquage Turn
This turn is very similar to a jump turn, accept your skis are kep on the snow. Ts essentially, an unweightes turn where you skis flattem, parallel to the slope, and your lower body and ankles quickly turn your skis.